Wednesday, 8 January 2014

How To Retrieve Windows 8 OEM Product Key From BIOS

The OEM license model has changed in Windows 8. If you buy a Windows 8 pre-installed computer, you will no longer see a sticker on the back or top of the machine with 5×5 product key printed on it. There is only an official Windows 8 logo sticker instead. That’s all.
The main intention for this change by Microsoft is to limit the number of keys being compromised. But to most of end users, it’s merely a good news no need to worry about the sticker fading or getting scratched. The downside is that they will have little chance seeing or saving a copy of it for future use, or as the physical approval for having a proper licensed Windows 8 computer.
The key is now embedded in BIOS and can be retrieved automatically during the activation process in Windows 8. Theoretically, you will never be asked for a key to active your machine. But to have the process run smoothly, you will need the right Windows 8 installation edition that matches the one stored in BIOS. Or, you will be prompted to type in the right product key.
So is there a way of knowing what my Windows 8 product key is?

If you have Windows 8 installed and activated

NirSoft’s ProduKey is your friend. It’s a free portable tool that reveals the keys not only for your installed Windows operating system but also other installed software as well, such as MS Office.

But if not

For example, how can I retrieve the key from a downgraded machine that runs Windows 7?
That’s where RWEverything  (Read, Write Everything) comes to rescue. Let me quickly show you how:
First of all, download the proper version from its Download page. There is also a portable version available that lets you to run and forget it.
Extract the program from the zipped file, and double-click the RW.exe executable file to launch the program.
Then, click ACPI icon from the top toolbar, and MSDM table in ACPI table. And you will find your BIOS embedded key right in the Data row.
RWEverything to extrieve windows 8 key from BIOS
I’ve tested it on several Windows 8 pre-installed  machine and have confirmed that the information retrieved within the tool is accurate.

/update on Oct 22, 2013/

A few comments mentioned below that the method described above doesn’t work on computers manufactured by Dell. Since I don’t have a Dell machine handy to try out, here are a couple things you can try and see if it works. Please do leave comment if you find a result, good or bad.
1. Try the NirSoft’s ProduKey tool to find out which key is used in the system, if you are currently using Windows 8.
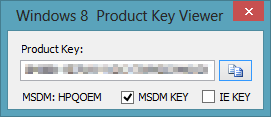
2. If you are on downgraded Windows 7 on pre-installed Windows 8 computer, try this tool (direct download link) and find the key when MSDM option checked. I have feel that this may still not work with Dell computer, since it’s still looking for the same MSDM table, but it’s not hurt giving another tool a try.
Windows 8 Product Key Viewer

Wednesday, 1 August 2012

Microsoft Office Outlook 2007 Creating Multiple Standard Toolbars

Question:
I'm running Microsoft Office 2007 Standard edition on Windows 7.  When I run Outlook it randomly creates and displays multiple Standard toolbars flooding the window.  The normal menu bar also disappears.  Turning off the toolbars has no effect as they simply reactivate themselves.
Running Outlook in Safe mode seems to have restored the normal window display but I would like to be able to run Outlook in normal mode.
Does anyone have any idea what's going on here and how to fix this?  I've looked at other posts and found some vaguely related issues.  That's how I found out about safe mode.  But noone else seems to describe this specific issue.

Answer:
Rename the file ‘OUTCMD.DAT’on the machine and check if it helps.

1. Go todrive:\Documents and Settings\user\Application Data\Microsoft\Outlook\outcmd.dat (Where " USER” is the name of your Windows user account. If not, search your local disk for the file name.
3. Rename the OUTCMD.DAT file to a different file name.
4. Restart Outlook and check.


Monday, 30 July 2012

How to Change windows 7 Product key

Windows 7 Licensing Manager – slmgr.vbs

  1. Click on start and type command (cmd) with run as administrator option.
  2. Now type following command

    “slmgr.vbs -ipk <insert your new product key here>”

  3. To activate windows after changing the key, run “slmgr.vbs -ato”

You should be familiar with the Windows Licensing Manager if you have problems activating Windows 7. Here are the runtime options for “slmgr.vbs”:
  • -ipk [KEY] installs product key (enterprise too) or swaps current key
  • -upk – uninstalls product key
  • -ato – activate Windows
  • -dli [Activation ID | All] – license information
  • -dlv [Activation ID | All] – display license information in detail
  • -xpr – displays the expiration date for current license state
  • -dti – display installation ID necessary to activate online
  • -atp – activates Vista with the provided Confirmation ID – (without inverted commas)
  • -cpky – will enable you to remove information related to product key from the registry
  • -ilc – installs a license – (without inverted commas)
  • -rilc – re-install system license files
  • -rearm – reset the licensing status of your Windows Vista
  • -sprt port Set KMS host listening port (where port is the port ID).
  • -sdns Enable dynamic DNS publishing (default).
  • -cdns Disable dynamic DNS publishing.
  • -cpri Set KMS processor priority to low.
  • -spri Set KMS processor priority to normal (default).
  • -xpr Display the date when the activation will expire.

Sunday, 10 June 2012

How to setup IMAP email account in IPAD

How to setup IMAP email account in IPAD

1 If this is the first account you’re setting upon on the iPad tap Mail. Otherwise, from the home screen tap Setting ..> Mail..> Accounts..> Add Account.


2. Choose your email account type. For setting up email to work with your domain email address tap Other.


3.Enter your Name , Address(email address), Email Password ,and description.


Name: Your Name
Email: XXXX@your domain name
Password: Your Password
Description: mail.your domain.com

4. Select IMAP


Key in the same information for Incoming Mail Server and Outgoing Mail Server
Host Name: mail.your domain name
User Name: XXXX@your domain name

Password: Your Own Password

5. Click Next..> and system will appear verifying


6. If system showing message as Cannot verify server indentity, tap Details and tap Accept.


7. Done